Introduction
Installing a panel fence with concrete posts creates a durable, long-lasting boundary for your property. Concrete posts offer superior strength and longevity compared to wooden posts, making them ideal for areas with harsh weather conditions or high winds. This comprehensive guide will walk you through the complete installation process.
Why Choose Panel Fence with Concrete Posts
Panel fencing with concrete posts offers several advantages over traditional wooden fencing:
- Durability: Concrete posts last 25-30 years without replacement
- Weather resistance: Won’t rot, warp, or deteriorate like wood
- Low maintenance: Minimal upkeep required once installed
- Stability: Provides excellent support for fence panels
- Cost-effective: Higher initial cost but lower long-term expenses
Tools and Materials Needed
Essential Tools
- Post hole digger or spade
- Spirit level (4-foot minimum)
- Measuring tape and chalk line
- Rubber mallet or dead blow hammer
- Mixing paddle and bucket
- Safety equipment (gloves, goggles)
Required Materials
- Concrete fence posts (appropriate height)
- Fence panels (wood, vinyl, or composite)
- Quick-setting concrete mix
- Galvanized brackets or clips
- Stainless steel screws or bolts
- Gravel for drainage
Planning Your Fence Installation
Step 1: Check Property Lines and Permits
Before starting, verify your property boundaries and check local building codes. Many areas require permits for fences over 6 feet tall. Contact your local building department to understand requirements in your area.
Step 2: Mark Your Fence Line
Use stakes and string to mark your fence line. Measure the total distance and divide by panel width to determine the number of posts needed. Remember that posts are typically spaced 6-8 feet apart, depending on panel size.
Step 3: Locate Utilities
Call 811 (or your local utility marking service) at least 48 hours before digging. This free service marks underground utilities to prevent dangerous and costly accidents during excavation.
Step-by-Step Installation Process
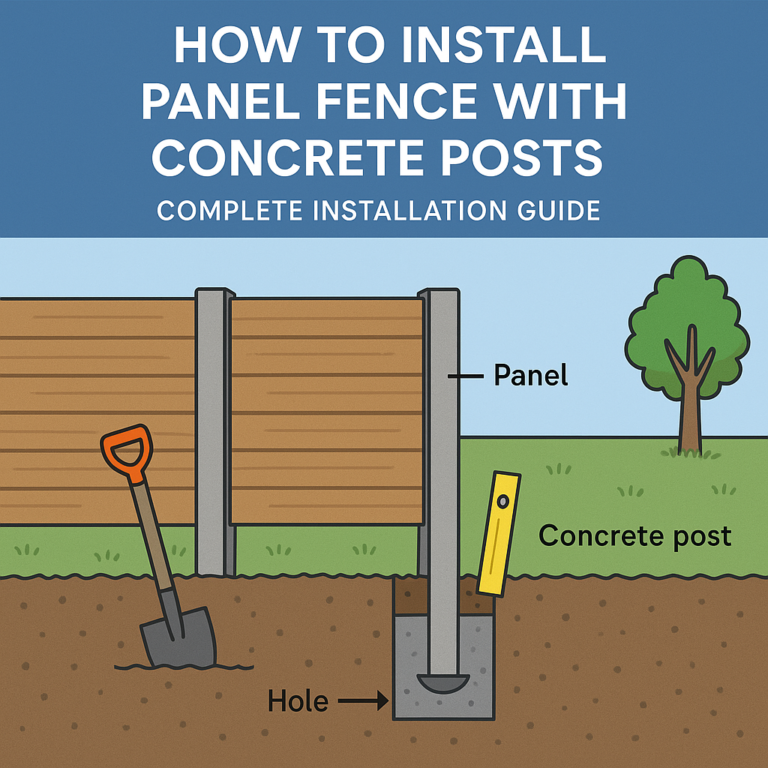
Step 1: Dig Post Holes
Dig holes for your concrete posts using a post hole digger or spade. Each hole should be:
- One-third the height of your post above ground
- Three times the width of your post
- 6 inches deeper than the final post depth for gravel base
For example, if your post extends 6 feet above ground, dig the hole 2 feet deep plus 6 inches for gravel.
Step 2: Prepare the Hole Base
Add 6 inches of gravel to the bottom of each hole. This provides drainage and prevents water from pooling around the post base. Compact the gravel using a tamping rod or the end of your post.
Step 3: Set the First Post
Place your first concrete post in the hole, ensuring it’s plumb using a spirit level. This corner or end post will serve as your reference point for the entire fence line.
Add quick-setting concrete mix around the post, following manufacturer instructions. Most quick-setting concrete requires adding water directly to the dry mix in the hole.
Step 4: Align Additional Posts
Using your chalk line or string, set remaining posts ensuring they’re perfectly aligned. Check each post with a spirit level for plumb installation. Maintain consistent spacing between posts based on your panel dimensions.
Step 5: Secure Posts with Concrete
Fill each hole with quick-setting concrete mix, leaving 3-4 inches below ground level for soil. Add water according to package directions. The concrete will set in 20-30 minutes, allowing you to proceed with panel installation.
Step 6: Install Fence Panels
Once concrete has set, install your fence panels. Most concrete posts have pre-formed slots or require brackets for panel attachment. Common installation methods include:
Slotted Posts: Slide panels directly into post slots. This method provides the cleanest appearance and strongest connection.
Bracket Method: Attach galvanized brackets to posts, then secure panels to brackets using screws or bolts.
Direct Attachment: For some panel types, you can attach directly to the post using appropriate fasteners.
Step 7: Secure Panel Connections
Ensure all panels are level and properly secured. Use stainless steel fasteners to prevent rust and corrosion. Check that gates and moving parts operate smoothly.
Step 8: Backfill and Clean Up
Backfill around posts with soil, creating a slight slope away from each post for drainage. Clean up excess concrete and debris from the work area.
Common Installation Challenges
Uneven Ground
For sloped terrain, you have two options:
- Stepped Installation: Install panels in steps, following the ground contour
- Raked Installation: Angle panels to follow the slope
Rocky Soil
Hard or rocky soil may require renting a power auger or hiring professional excavation services. Don’t attempt to force dig through rock with hand tools.
Utility Conflicts
If you encounter utilities while digging, stop immediately and contact the utility company. Never dig around marked utilities without professional guidance.
Maintenance and Longevity
Regular Maintenance Tasks
- Inspect panels annually for damage or loose connections
- Clean panels with mild soap and water
- Check post stability after severe weather
- Lubricate gate hinges and hardware
Troubleshooting Common Issues
Loose Panels: Tighten fasteners or replace worn brackets Sagging Gates: Adjust hinges or add support cables Panel Damage: Replace individual panels as needed
Cost Considerations
Panel fence installation with concrete posts typically costs:
- DIY Installation: $25-40 per linear foot
- Professional Installation: $40-75 per linear foot
Factors affecting cost include:
- Panel material (wood, vinyl, composite)
- Fence height and style
- Ground conditions
- Local labor rates
When to Hire Professionals
Consider professional installation if:
- You’re installing over 200 linear feet
- Dealing with significant slopes or challenging terrain
- Local codes require professional installation
- You lack experience with concrete work
Conclusion
Installing a panel fence with concrete posts creates a durable, attractive boundary that will serve your property for decades. While the project requires careful planning and physical work, the long-term benefits make it a worthwhile investment.
Take time to properly plan your installation, use quality materials, and follow each step carefully. With proper installation and minimal maintenance, your concrete post fence will provide security and privacy for years to come.
